Ever looked for information on how to install Android on PC, but just failed to find out what you're looking for? Well, you're not the only one. There's not a whole lot of detailed information on how to do that and most of the stuff that's out there is mostly aimed towards tech-savvy people.
That's why we decided to make a detailed article on how to do it step by step - for everyone. Mind you, we're not talking about emulators like Bluestacks here. We're talking about the full Android experience running natively on your computer.
With all of that being said, let's get right into it!
A Couple Of Things To Keep In Mind
Before we get started, there are a couple of things that you need to know:
- Remix OS is out of the question
- Our only available choice can be very buggy and/or unstable
For those of you who don't know, Remix OS used to be the best choice for installing Android on a computer and running it natively. However, it's terribly outdated and for this reason, we cannot recommend it. It's still running on Marshmallow.

The next thing you need to know is that our other available choice, Android-x86, can be quite buggy and unstable - depending on your hardware. So, before installing it, give it a small test first. You can run it directly from a USB stick.
Here's what we used for this guide:
- Mobo: MSI B450 M2 V2
- CPU: Ryzen 5 2600
- GPU: GTX 1060 6GB
And for us, Android-x86 just keeps on crashing every time we head back to the launcher or the multi-task bar. This goes to say that it's not unusable. But, it can be very annoying.
All we're trying to say is that if you've got similar specs, then you'll most likely end up facing the same issue. So, do keep that in mind. And with that out of the way, let us move in with the guide!
1: Gather Your Inventory
First things first, gather everything that you'll need to move on. That includes a:
- USB thumb drive
- A working PC with Linux or Windows installed
- UNetbootin or Rufus
- Android-x86
The first thing you'll need is a USB thumb drive. So, if you don't have one, now is the time to order. It doesn't have to be anything fancy. Anything that has at least 8/16 gigs of memory will get the job done. Faster options with more memory are just a luxury if you can afford them.
An external hard drive will get the job done as well. But, a thumb drive is recommended if you want to play it safe.
Other than that, you'll obviously also need a working PC with either Windows or Linux installed. Anything that's not a fossil should work. There's always the issue of compatibility, but that's a topic for another time.
Last, but not least, you need software to write Android on your bootable thumb drive or external HDD. For that, UNetbootin and Rufus are two of the best options out there.
Everyone seems to recommend UNetbootin, but those of you who are stuck with external hard drives can only use Rufus since that's the only option that supports them. Linux users, on the other hand, are stuck with UNetbootin since Rufus is not natively available on that OS.
And let us not forget about Android-x86. That's the Android port that we're going to install. So, you'll obviously need it!
2: Write Android-x86 To The Drive
Assuming that you've already downloaded either UNetbootin or Rufus and Android-x86, the next thing that we need to do is write Android-x86 on our thumb drive or external HDD. Do keep in mind that most people recommend thumb drives, but an external HDD worked for us well with the Rufus mod.
On Linux
Linux users can install Unetbootin by opening the terminal and typing:
-
sudo add-apt-repository ppa:gezakovacs/ppa sudo apt-get updatesudo apt-get install unetbootin
On Windows
So, to install Android-x86 on your bootable drive:
- Open Rufus or Unetbootin
- Select your thumb drive or external HDD (Make sure to click on "List USB Hard Drives" on Rufus. This option is not available in Unetbootin)
- Select the Android-x86 ISO on the "Disk Image" section (Should be available on your "Downloads" folder - unless you've picked a custom location)
- Then hit OK/START and wait for the installation to finish
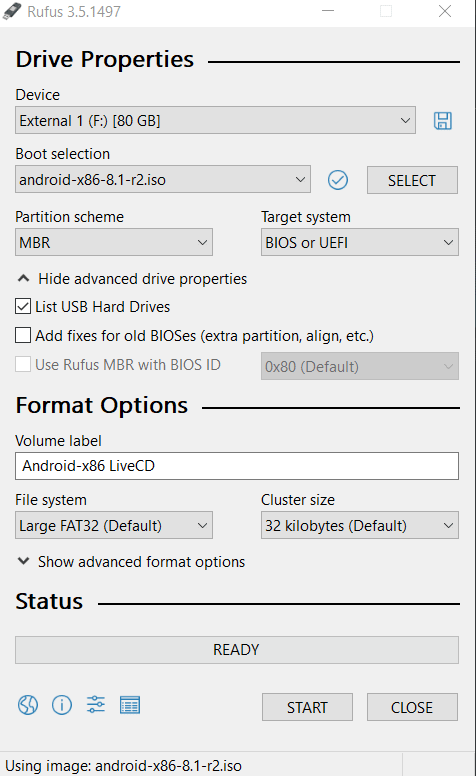
That's how the final setup should look like before the installation on Rufus and it's the same thing for Unetbootin. Again, the main difference is that you can't do it with an external drive there.
The installation may take a while and that will mostly depend on how fast your drive is. So, be patient.
And in the rare case that the installation is stuck, just cancel the process and start over.
3: How To Install Android On PC
This is where the scary part starts for non-tech-savvy people. Do you know anything about BIOS settings? Well, now is your chance to learn.
See, a PC boots up, it always displays a couple of buttons that you can press to get into its "BIOS". That button is often either the F2 or the DEL. In rare occasions, it may be something else.
So, find out what that button is, press it, and get into the BIOS of your computer. The BIOS is sort of pre-installed software on a dedicated chip of your motherboard and it allows you to tweak numerous settings which are critical for the function of your computer.
One of these functions is boot priority and that's what we need. Don't touch anything else.
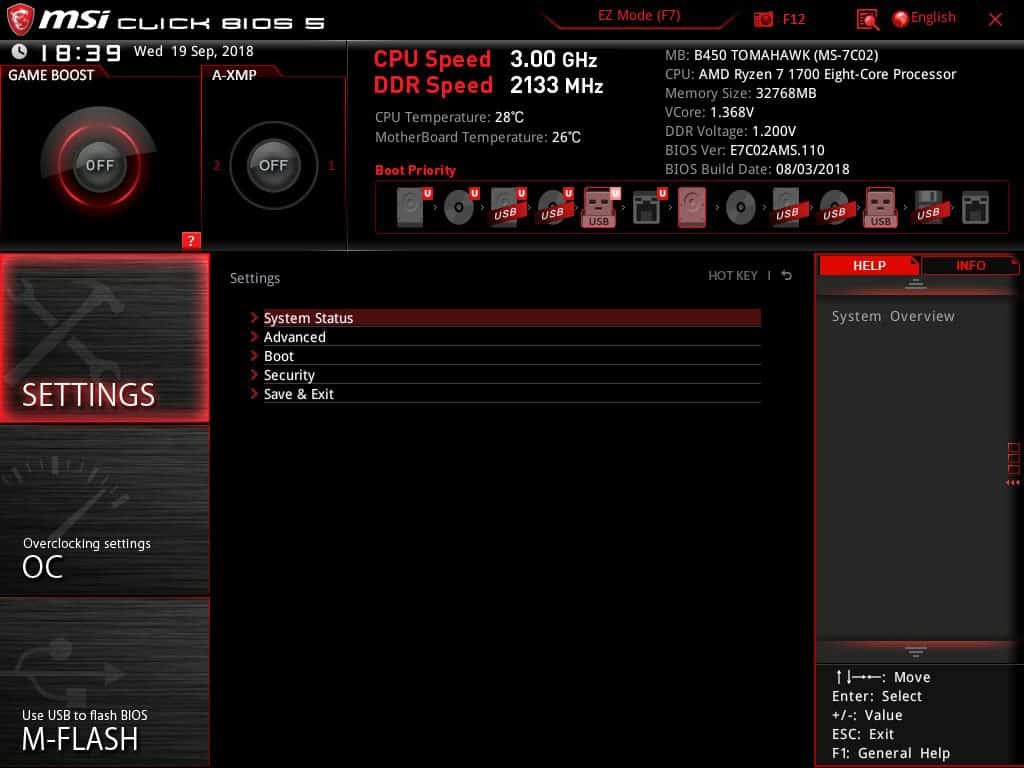
In this case, it's right there in front of us below the motherboard temperature readings. Boot priority.
On MSI B450 motherboards, all you need to do is drag your USB thumb drive to the first place on the left and reboot. That's all there is to it.
And here lies our first problem: The exact steps differ from motherboard to motherboard. More often than not, you'll find this option under:
- Boot
- Boot order
Or anything like that. Once your bootable thumb drive is the main priority, reboot the system and that should get you right into the Android-x86 options.
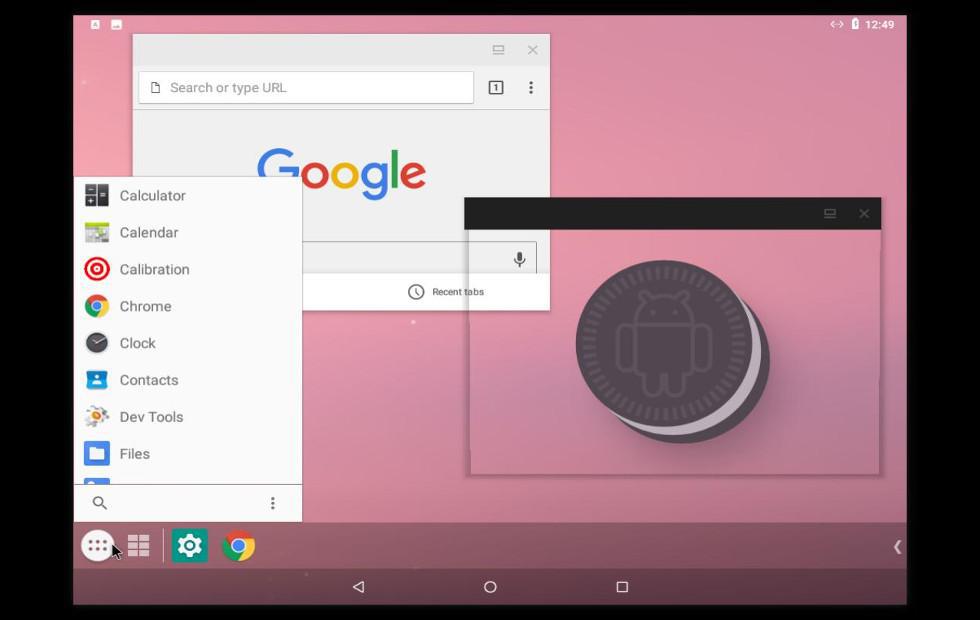
From here on out, simply follow the instructions that Android-x86 is going to provide you with and you'll be good to go.
4: Disclaimer
As mentioned before, depending on your hardware, Android-x86 can be pretty damn unstable. Even to the point of bricking your PC.
So, if you're looking on how to install Android on PC, we'd highly recommend to first give it a test drive. Just try it live from the thumb drive.
Connect to the Internet, install and run some apps, multi-task a little, just make sure that everything works fine. Because depending on the drive that you'll choose to install it, Android-86 may replace the primary OS of your computer.
And just so you know, if something does end up going wrong, Updato won't take any responsibility for it. Especially if it's due to a mistake you made.
So, again, try out the OS before installing it. And once you decide to install it, make sure that the primary OS is not being replaced by it. Unless, of course, that's what you're looking out for.
Wrapping Up
So, for those of you who want to know how to install Android on PC, let's summarize the steps:
- Download Rufus/Unetbootin and Android-x86
- Write Android-x86 to a thumb drive or external HDD by using Rufus or Unetbootin
- Make the BIOS boot from that drive
- Test drive the OS for a bit
- Follow the instructions that Android-x86 will give you
And that's about it. If you've got any questions, let us know about them and we'll try to get back to you.
Feel like we forgot to mention something important? Got anything wrong? Then let us and everyone else know about it in the comments section down below!
Like what you see? Then don't forget to follow us on Facebook and Twitter for the latest news, reviews, listicles, apps, games, devices, how-to guides, and more!