Have you got the next million dollar app idea floating around in your pretty little head? Has the lack of coding ability got you down? Do your pockets feel a little shallow to enlist a nerd’s help?Oh pshaw, don’t let trivial excuses stop you from realizing your dream. Thankfully, there’s a nifty little resource called App Inventor that allows you to easily create your own app and post it to Google Play for the whole world to see, and perhaps even buy. But you'll have to do a little homespun marketing to stand apart from the crowd.The world of apps is sort of like the wild wild west of startups. People are striking it rich with literal overnight sensations, and not all of those cash cows are particularly brilliant, nor all that savvy when it comes to development and programming.Truth be told, some apps are so crude that you have to wonder if the developer has any coding talent at all. If the latter describes you, and you’ve been bit by the bug to create your own Android app, don’t be discouraged, because MIT, yes that MIT, wants to make app building as easy as assembling a jigsaw puzzle. App Inventor is basically comprised of two sides, a Design interface, and a Coding Blocks interface, both sharing the same App Inventor umbrella.Once you have the basic skeleton of your app laid down, it’s time to head over to the building blocks side of App Inventor.
 Once your app is developed enough to test, you’ll want to download the nifty MIT AI2 Companion app to upload your creation to your test device, which can be a tablet or cell phone.Ideally, you’ll want to test your app on multiple devices, including the AI Emulator, just so you can see how the app responds in different environments. As is often the case, an app’s performance can vary drastically from one device to the next, so thorough testing is a must.
What the heck is App Inventor and who's behind it?
App Inventor was initially released in 2010 as a Google Labs project. As Google often does, participation in the App Inventor project was by invite only, though slipping past the bouncer at the velvet rope wasn’t exactly difficult. To gain membership, all you had to do was email Google and ask. Typically, access to the project was granted within a couple weeks or less, and users were encouraged to start coding and posting their creations to Google’s App Market, later coined as Google Play.Some postulated that the project was created to flood the App Market with more apps so as to compete with Apple’s App Store, whose offerings easily outpaced Android at the time. However it came about, the ability to develop Android apps was now placed in the hands of the everyday laymen.Good news - you missed the growing pains
In its early days, App Inventor was fairly crude but the idea showed promise. It boasted a handful of practice projects available to try, which were basically an informal training on how to use the program. Projects like Hello World, simple drawing apps, Find My Car-type GPS location apps, and others were available as step-by-step tutorials.Since then, several App Inventor how-to books have been written to help make this easy-to-use program even easier to understand.Interest in the program grew rapidly, clearly denoting a strong desire in consumers to create their own Android apps without the need to enroll in an expensive tech school. Over the next two years, App Inventor grew at such an accelerated rate that Google felt it could no longer support the project effectively. In 2012, it was bequeathed to MIT with a healthy financial donation to help get AI on its feet. An all new App Inventor was born, and not-so-innovatively dubbed App Inventor 2.You're in luck - it's so much easier than it used to be
In the old days, App Inventor had a complicated setup process that discouraged many novice developers from even installing this “easy to use” wonder-program. However, App Inventor 2 has grown a lot since its early days, and the brainiacs at MIT have streamlined the installation process to a simple App Inventor Google Chrome plugin that can be installed with a single click.Even that dreaded emulator of old has been streamlined, and you can now upload test apps via WiFi to most any Android device using the MIT AI2 Companion App.Fear not, even children know how to use App Inventor
In fact, the all-new App Inventor is so easy to use that a 10-year-old girl, Chinmayi Ramasubramanian, used the program to create a disaster relief app for Chennai flood victims while she was at home sick from school. The idea came when the young girl learned that donated relief items were being squandered and not actually making it into the hands of the people who needed it most.Truth be told, Chinmayi’s app is rather simple and barebones, but the young girl posted it to Google Play where it can indeed help people in need and perhaps serve as a template for future disbursements of disaster relief aid.Admirably, this 10-year-old had loftier goals than just striking it rich; the girl was actually trying to change the world. Point being, if a sick kid can develop an app in an afternoon and post it to Google Play, what’s stopping you from realizing your dream?How to get started using App Inventor 2
Simply put, App Inventor demystifies the process of coding apps and reduces it to a literal jigsaw puzzle of drag and drop coding blocks that can be combined to create your very own Android app.No, it won’t be the most cutting-edge app ever published, but you just might be surprised by how powerful this innovative tool can be. Learning the ins and outs of App Inventor has a learning curve, but if you’ve ever designed your own greeting card or newsletter, then you already have a general understanding of the process.The basics on how to use the Design interface
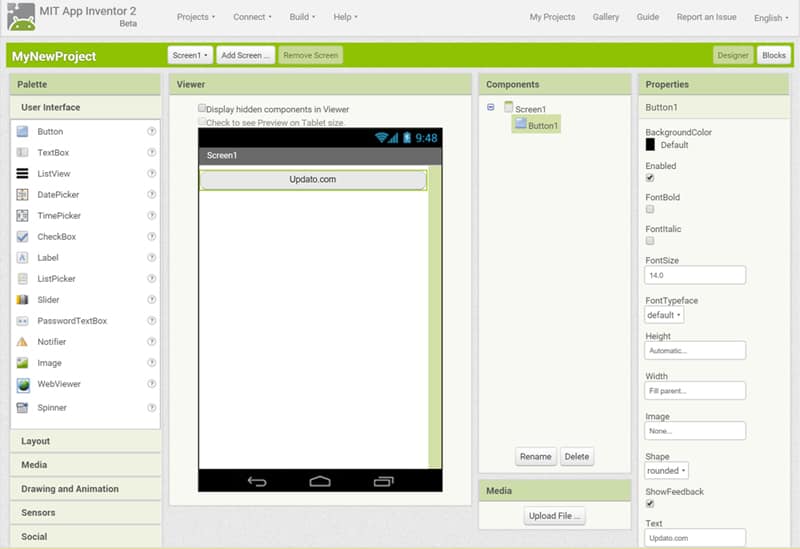 App Inventor is basically comprised of two sides, a Design interface, and a Coding Blocks interface, both sharing the same App Inventor umbrella.
- To start, begin on the design side of things, which features a list of drag and drop elements on the left, like buttons, drawings, sprites, and accelerometer triggers.
- On the right, you’ll find labels and aesthetic choices, like font size, button style, margin justifications and such.
- Drag and drop your elements to create your app’s layout and see it come together in a preview window at the center of your screen.
- You can also setup multiple screens, or pages for your app and layer the order in which they appear.
If you love jigsaw puzzles, then you’ll love the Coding Blocks interface
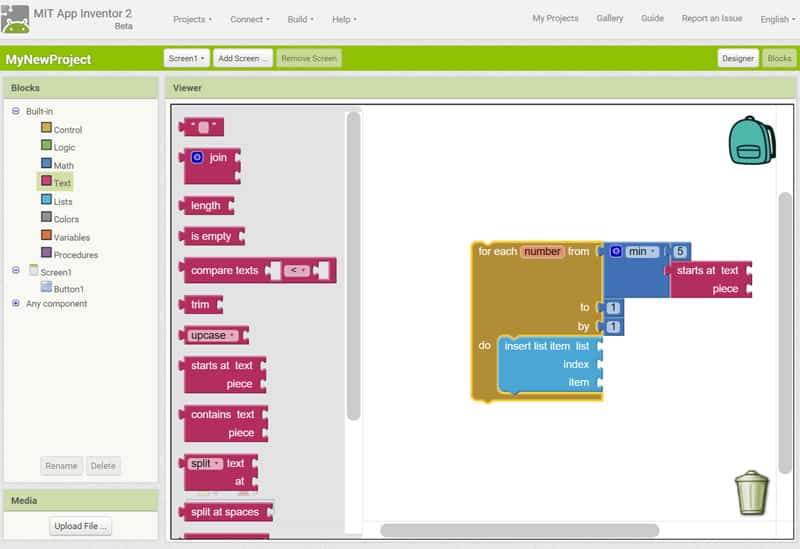 Once you have the basic skeleton of your app laid down, it’s time to head over to the building blocks side of App Inventor.
- Here, you’ll do the heavy lifting of coding by placing blocks and combining them with other blocks to trigger events within your app.
- The available block categories include, control, logic, math, text, lists, colors, variables and procedures.
- The blocks fit together like puzzle pieces, and while the heavy coding of true app development has been drastically minimized, you’ll still need to charge up some brain cells to make it happen.
How to test your app on a physical device or emulator
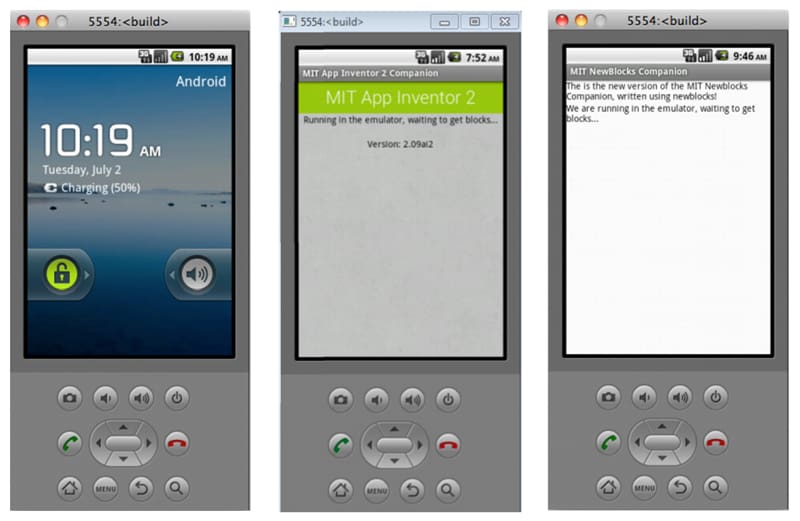 Once your app is developed enough to test, you’ll want to download the nifty MIT AI2 Companion app to upload your creation to your test device, which can be a tablet or cell phone.Ideally, you’ll want to test your app on multiple devices, including the AI Emulator, just so you can see how the app responds in different environments. As is often the case, an app’s performance can vary drastically from one device to the next, so thorough testing is a must.
Presentation is everything
You should put some thought into the screen orientation of your app and decide if it will it display in portrait, landscape, or both. Will you lock the orientation so it views the same on all devices, or will you optimize it for landscape tablets too?The testing phase is where all your trial and error will happen. It’s never too early to upload a sample app to your test devices so problems can be identified early and dealt with before investing too much work into an idea that may not be feasible.No, you're not going to create much in a few hours, but you can create some truly great apps with App Inventor, provided you’re willing to put in the time and effort. Be sure to check out MIT’s App Inventor website for more resources, and visit their official App Inventor YouTube Channel for some helpful how-to videos.How to post your app to Google Play
Okay, so you’ve put in some hard work, sweat a few bullets and finally created your own Android app that you’re happy with.Now what? Well, naturally you’ll want to post it to Google Play for the entire world to see, and believe it or not, getting an app listed on Google Play isn’t as difficult as one might think. Here’s how it all shakes down:- Package your APK - the first step to posting your app to Google play is to package your app as an APK file. An APK is the default file format for all Android apps, and creating your APK is as simple as exporting your app from App Inventor and creating the default APK.
- Open your Google Play vendor account - visit the Google Play Developer Console, pay a one-time registration fee of $25 dollars, and open your developer’s account. Voila – you’re officially an app developer.
- Post your app - now, the process of actually posting an app to Google play has a host of procedures and elements required to make the magic happen, and Google has the process all laid out quite nicely. Basically, you’ll need to...
- design an app icon
- take screenshots
- write the ad copy for your app describing what it does and why everyone should download it
Tell the world about your app
How you choose to describe and pitch your app to users is entirely up to you. Take some time browsing successful apps on Google Play and see how others have done it, then come up with a winning strategy of your own to market your app.The sea of apps out there can be overwhelming, and yours is just another spec of sand on a very large beach. So put some thought into how you’ll make your app stand apart from the rest. Truth be told, some of this homework should be done before you even begin developing your app with App Inventor.How much does your app cost?
One of the things you’ll have to decide while publishing your app is if it’s going to be free or paid. Most apps only cost a couple bucks and some of that income is shared with Google Play. Free apps, however, cost your customers nothing, so there’s no royalties to be shared with Google.You could even setup a donation link within your app where users can donate an amount of their choosing to your Paypal account, which would not be shared with Google Play. How you choose to distribute your app is entirely up to you, though it’s often a good idea to offer two versions of your app, both free and paid, with the paid version unlocking special features not offered in the free version.How to market your app beyond the upload
Once your app is uploaded, you may be tempted to just sit back and let the world discover your greatness. And if that’s your plan, then you just might be destined to fail.Creating an awesome app and posting it to Google Play are just the first steps on a long journey. The next problem you should be tackling is marketing. You need to figure out a way to let the world know about your awesome new app.- Do a social media blitz
- Publish a well-crafted press release.
- Copy strategies of successful startups like Tinder, and distribute your app at college campuses to build your audience.
Getting busy
Now that you have a basic understanding of how to create your own app and get it posted to Google Play, what will you do with this knowledge?It’s been said that you don’t have a good idea until someone else agrees you have a good idea too. Consider finding a partner to collaborate with and create your own Android app as a team. The most popular app think tanks, like Y Combinator, require app ideas to be presented by teams of two or more, so the concept of buddying up with a partner has already been proven to work wonders.Post your app idea in the comments below and find your partner
Sure, the fear of having your million dollar idea stolen is a very real one, but it’s also true that if you put nothing out into the universe, then nothing is exactly what you’ll get in return.In that vein, consider posting your next great app idea in the comments below, and maybe it’ll give rise to the next billion dollar app dynamic duo. And if your idea gets stolen, then hey, perhaps you’ll strike it rich with a lucrative lawsuit.Either way, it’s better to do something than nothing at all. No overnight sensation was ever born from fear and apathy. Volunteer and pitch your ideas fearlessly and perhaps you’ll be pleasantly surprised by what the universe sends back to you.And if you've already created an app with App Inventor, be sure to post a comment about that too so we can all check it out!Featured Image © androidcentral.comSimilar / posts
How to create your own Android app with App Inventor and post it to Google Play
March 17th, 2016
Updated on February 19th, 2019
How to create your own Android app with App Inventor and post it to Google Play
March 17th, 2016
Updated on February 19th, 2019
How to create your own Android app with App Inventor and post it to Google Play
March 17th, 2016
Updated on February 19th, 2019